• Skip to primary navigation
  • Skip to main content
  • Skip to primary sidebar
  • Skip to footer

Luiz Hara

Food, Wine, and Travel

  • About
  • Work With Me
    • Food, Wine & Travel Writing
    • Consulting & Development
  • Recipes
  • Cookery Books
  • Blog
  • Supper Club & Classes
  • Press
  • Contact
  • Nav Social Menu

    • Facebook
    • Instagram
    • Twitter

Supper

Flourless Chocolate Cake with Armagnac Prunes

5th January 2018 by Luiz Hara Leave a Comment

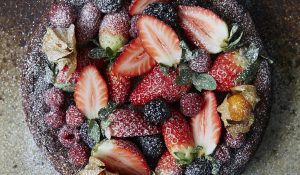
This cake, although not Nikkei in its own right, is a rich and chocolatey dessert that works a treat with Japanese Matcha ice cream. There is something about green tea and dark chocolate that together create an alchemy only a few desserts can claim. This cake can be made a couple of days in advance, making it a great dessert with minimal fuss. So popular was this flourless chocolate cake and home made green tea ice cream combination in my Nikkei supper club that it was a fixture on the menu for well over a year.

Ingredients:

  • 300g good quality dark chocolate (at least 55% cocoa solids but no more than 70%)
  • 140g unsalted butter
  • 6 tbsp Armagnac or brandy
  • 5 large eggs, separated
  • 140g golden caster sugar
  • 200g ready-to-eat, stoneless prunes
  • 300g mixed berries (blackberries, raspberries and strawberries) for decoration
  • Icing sugar for dusting
  • Equipment: a 9-inch (23cm) springform cake tin, greased, and lined with baking parchment.

Method:

  1. The prunes will need to be soaked preferably overnight in Armagnac. Before soaking, place them in a saucepan with 275ml water or until they are completely covered, bring them to a simmering point, and simmer for 20-30 minutes. Pour the prunes and their cooking liqueur into a bowl and stir in 4 tablespoons of Armagnac while they are still warm. Leave to cool, cover the bowl with cling film and chill in the fridge overnight (or for a few hours if you forget to start a day earlier).
  2. When you are ready to make the cake, pre-heat the oven to 170°C. Start by breaking the dark chocolate into small pieces into a bowl, add the butter, and melt them over Bain-Marie with some simmering water, it will only take a few minutes (place some kitchen paper in the water to stop the bowl having direct contact with the heat and burning the chocolate). Stir it to a smooth, glossy mixture. Off the heat, add 2 tablespoons of Armagnac, mix well and leave to cool.
  3. In a large bowl, combine the egg yolks and sugar. Using an electric hand whisk, whisk the yolks and sugar for a few minutes until the mixture has partially whitened and once the whisk is lifted, leaves a ribbon-like trail, known as ribbon-stage.
  4. Cut the soaked prunes in half, combine them with the melted chocolate, this will help to bring the temperature of the chocolate down, then mix this into the whisked egg yolk and sugar mixture.
  5. In another large bowl, whisk the egg whites to soft peaks (use the electric hand whisk for this but ensure that it is clean and with no trace of water or yolks or your egg whites will not form soft peaks). Fold it into the egg and chocolate mixture.
  6. Spoon the cake batter into the prepared tin and bake it in the centre of the pre-heated (170°C) oven for 25 to 30 minutes or until the centre feels springy to the touch. Allow the cake to cool in the tin (it will deflate quite a bit so don’t be alarmed). When it is completely cool, cover the tin in cling film and chill for several hours (it can be made and chilled 2 or 3 days ahead of serving). Take the cake out of the fridge a couple of hours before serving.
  7. Decorate the cake with the mixed berries placing them on top of the cake in a haphazard but attractive sort of way. I like cutting most of the strawberries in half lengthways but keeping the green stems, they will go further this way and will look prettier too. Make sure the fruit is dry when decorating the cake or the icing sugar will melt and you will not get a dusting effect.
  8. Just before serving, sprinkle the top of the cake with icing sugar using a fine sieve. Cut the cake into small slices, as it is very rich, and serve. This cake goes well with a scoop of green tea ice cream.
Print Recipe
Flourless Chocolate Cake with Armagnac Prunes
Servings
Servings

Filed Under: Baking, Breakfast, Dessert, Supper

Salmon and Passion Fruit Tiradito, Crispy Sweet Potato & Espelette Pepper

5th January 2018 by Luiz Hara Leave a Comment

The world is your oyster when it comes to seasoning Tiradito. Much as I love using lime as a major component for Leche de Tigre (the marinate for ceviches and tiraditos), there is a whole range of different fruits to play with. Here, I use passion fruit and aji amarillo (Peruvian yellow chilli) to create a zingy, punchy dressing that works really well with the fatty salmon. Finish the dish with a dusting of fine Espelette pepper for a gentle, fruity hint of chilli.

Ingredients (serves 4):

  • 200g sushi-graded salmon fillet, skinned
  • 400g sweet potatoes
  • Sunflower oil for deep-frying
  • a few sprigs of chervil (or coriander)

For the passion fruit Leche de Tigre (Tiger’s Milk):

  • 4 small passion fruit, juice and seeds (around 50g in total)
  • 1 teaspoon of aji amarillo paste
  • 1 lemon, juiced (60ml)
  • ¼ teaspoon of salt
  • 1 clove garlic, cut
  • 1cm slice of ginger
  • 1 tbsp mirin
  • 1 tbsp sugar
  • ¼ banana shallot, very finely chopped
  • 2 tbsp of chervil, very finely chopped (or coriander)
  • A sprinkle of Espelette pepper (can substitute with sichimi pepper)
  • A sprinkle of Maldon salt flakes

Method:

  1. Make the passion fruit leche de tigre by whizzing all the ingredients (except the shallot and chervil, and 1-2 tablespoons of passion fruit seeds to be reserved for the presentation) in a food processor. Pass it through a fine sieve, add the finely chopped shallot and chervil. Refrigerate until needed.
  2. Peel the sweet potatoes. Using a zester or preferably a Spiralizer, cut fine strips of potatoes rather like spaghetti. Line a plate with absorbent paper. Add sunflower oil to a pan and heat to 140°C (note – use a deep pan and do not fill more than 1/3 full as the hot oil will rise to the surface as the potato is added). Fry the potato spaghetti for about 1 minute until lightly browned, transfer to the lined plate. The potato strands will not be crispy at this stage but do not worry – we will re-fry them just before serving. Keep the oil hot.
  3. Remove any residual brown flesh from the salmon fillet. Cut the salmon into thin slices and arrange them in a single row over each of the four serving plates. For each plate, spoon 2 to 3 tablespoons of the passion fruit leche de tigre over the salmon and dot with a few passion fruit seeds around the plate. Let it ‘cook’ for 3 to 5 minutes.
  4. Meanwhile, quickly re-fry the potato spaghetti for another 30 seconds, drain on kitchen paper and season with fine sea salt.
  5. When you are ready to serve, arrange a line of crispy sweet potato spaghetti in the middle of the salmon row, and scatter a few sprigs of chervil (or coriander) on the plate. Sprinkle some Maldon sea salt flakes and Espelette pepper. Serve immediately.
Print Recipe
Salmon and Passion Fruit Tiradito, Crispy Sweet Potato & Espelette Pepper
Servings
Servings

Filed Under: Fish, Gluten-Free, Lunch, Nikkei Cooking, Pescatarian, Supper

Nikkei Sea-Bream, Yuzu & Green Jalapeño Rice Cooked in Clay Pot

4th January 2018 by Luiz Hara Leave a Comment

Tai gohan (sea-bream rice) is a classic of Japanese home cooking, and a dish I have always loved. It can be made in a rice cooker or in a clay pot or elegant pan to be served at the table for a wow factor. The fish fillets are cooked over the rice, imparting a delicious flavour to the whole dish. In this version I give a Nikkei interpretation, by adding a dressing of olive oil, yuzu juice and jalapeño green chillies, mixed into the rice just before serving. This is like traditional Japan embracing the spice of South America.

Ingredients (serves 8-10):

  • 4 sea bream fillets, scaled and pin-boned
  • 600g uncooked short-grain rice
  • 550ml dashi (1 tsp instant dashi dissolved in 550ml hot water) or water
  • 100ml cup light soy sauce (usukuchi)
  • 100ml cup mirin
  • 2.5cm piece ginger, peeled and cut in fine julienne strips
  • Sansho pepper, a sprinkle

For the Yuzu & Green Jalapeño dressing:

  • 1 green jalapeño chilli, de-seeded and finely chopped
  • 4 tbsp spring onions, finely chopped
  • 4 tbsp yuzu juice
  • 4 tbsp extra-virgin olive oil

Method:

  1. Wash the rice in a bowl with plenty of fresh water using a circular motion with your hand. Drain the water and repeat this rinsing three or four times until the water runs clear. Let it drain for 15 minutes in a sieve.
  2. In the meantime, prepare the soaking and cooking broth – combine the dashi or water, mirin and usukuchi soy sauce and set aside. Soak the drained rice between 30min (less sticky) and 4 hours (more sticky) in the cooking broth in the clay pot or rice cooker (see different methods below).
  3. Rice Cooker Method: After the soaking and before cooking, scatter half of the ginger strips over the rice, lay the sea bream fillets on top and turn the rice cooker on. It should take approximately 15-20 minutes to cook. Once the rice cooker’s alarm beeps indicating that the rice is cooked, let the rice rest for at least 15 minutes before opening the rice cooker.
  4. Clay Pot Method: tightly wrap a tea towel over the lid of a Japanese clay pot (known as donabe) or if you do not have one you can use a heavy casserole pan. After soaking time and before cooking the rice, scatter half of the ginger strips over the rice, lay the sea bream fillets on the top, I like arranging the fillets so that they look like an open flower, place the lid on top and bring to a boil. Once boiling, bring the temperature down to the minimum setting and cook for 15 minutes. Turn off the heat, and without opening the lid (the lid should not be opened at any stage of the cooking process), let the rice rest for a further 15 minutes.
  5. Up to this stage, this rice is a traditional Japanese ‘Tao Gohan’ or Japanese sea bream rice and can be served as it is, it will taste delicious. But for added va-va-vroom, I like serving this with a yuzu and green jalapeño dressing which I pour over the fish and rice at the table just before serving. To make the dressing just add all the ingredients together in a bowl and mix well.
  6. Take the unopened clay pot to the table, open it in front of your guests, and if desired, carefully remove the skin of the fish, sadly some people are squeamish about fish skin. Pour the yuzu and green jalapeño dressing over the fish and rice then using a wide wooden spoon, fluff the rice well breaking the fish into tiny pieces and mixing it together with the dressing into the rice. Mix thoroughly.
  7. If you are using a rice cooker, follow all the above steps although do not take the rice cooker to the table! Make all the necessary preparation and serve the rice in individual bowls at the table.
  8. To serve, place the rice in individual rice bowls, top with the remaining 1/2 julienned ginger in the centre of each bowl followed by a sprinkle of sansho pepper and serve immediately.


Filed Under: Fish, Lunch, Nikkei Cooking, Rice, Supper Tagged With: Nikkei Cooking

Primary Sidebar

Welcome!

Luiz Hara is a former banker turned Le Cordon Bleu chef and supper club host. He is a Great Taste Awards judge, food & travel writer, and author of “Nikkei Cuisine: Japanese Food the South American Way”. Luiz is currently working on his second cookbook “The Japanese Larder: Bringing Japanese Ingredients into Your Everyday Cooking” which will be published in Autumn 2018.

Reader Favorites

Prawn Moqueca & Coriander Rice Donburi

Salmon and Passion Fruit Tiradito, Crispy Sweet Potato & Espelette Pepper

Flourless Chocolate Cake with Armagnac Prunes

Nikkei Sea-Bream, Yuzu & Green Jalapeño Rice Cooked in Clay Pot

Footer

Instagram did not return a 200.

Follow me @thelondonfoodie

  • Facebook
  • Instagram
  • Twitter

Luiz Hara is a former banker turned Le Cordon Bleu chef and supper club host. He is a Great Taste Awards judge, food & travel writer, and author of “Nikkei Cuisine: Japanese Food the South American Way”. Luiz is currently working on his second cookbook “The Japanese Larder: Bringing Japanese Ingredients into Your Everyday Cooking” which will be published in Autumn 2018.
Many of the photographs are from the Nikkei Cuisine coobook by Quarto Publishers, and were shot by Lisa Linder.

Sign up for the latest recipes, supper club and cookery class dates: Click here to learn more!

Copyright © 2025 · Luiz Hara | All Rights Reserved

Sign up for the latest recipes, supper club and cookery class dates

Click here to learn more!